Monday, August 30, 2010

Installing New Carpet: Eeeeeeeeeek...it's Like Moving...TWICE

When was the last time you had carpet installed?  For us it's been about 18 years and it was really time.  Last year we put hardwood floors in the kitchen, breakfast area, living room, dining room and study and this year (TODAY) we re-carpeted the bedrooms and family room.  The prelude to this was moving EVERYTHING out of those rooms and closets and this was the perfect time to put in new baseboards and do some painting.  Talk about a PROJECT!  :)  We have been very busy beavers, to say the least.  First you move everything out...then you get to move it back in again!


This is our dining room at the moment!


  You should see the master bathroom!

 Here is the living room!!! You can't even see it!
   

 I'm really linking the way the carpet goes around the 
new fire stove and wood box.  I didn't want basebeboards around it
and I think it is looking nice.  See the carpet power stretcher they
are using to install the carpet?


    He's almost done with the family room. Time to move back in!

xox
Nancy

Thursday, August 19, 2010

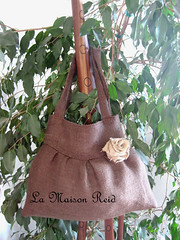
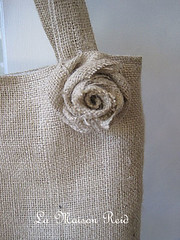
Burlap Purse with Shabby Rose

This summer has been incredibly busy with preparations for our daughter's wedding, the purchase of her and her fiancé's first home, visitors from around the world, business trip to Costa Rica and Honduras for Michael (even though he's officially retired) and ongoing work at the house.

Burlap Purse with Shabby Rose, Purse Tutorial, Burlap Tote

popular purse tutorial, How to make a burlap purse, make a burlap tote

I have a another wing chair slipcover (and tutorial) almost finished but I just needed a break from that project. I saw a darling burlap purse online but it was $95!!!!   Now, I can afford $95 for a purse but it was more of a challenge to see if I could make one as cute for a whole lot less than $95. I had just purchased chocolate brown burlap the day before beginning this project along with a darling pink chintz type print for lining.   I was originally going to make another tote like the one I made here:   


....but came up with something different:


 Chocolate Brown Burlap Purse with Shabby Rose Tutorial:

TERMS OF USE: This pattern is offered for free with the understanding that my readers will use it for personal use only. Please do not sell this pattern, bags made from this pattern, or bags made from modifications to this pattern (example: enlargements, wider/longer straps, etc.).   If you make this purse and post about it, the design credit must be given to Nancy at La Maison Reid with a link to this pattern.  I would like to say that I really appreciate the overwhelming support that I have received for putting this Burlap Bag with Shabby Rose out there for everyone to use.  It’s immensely gratifying to receive such gracious emails from so many people who are using and enjoying it for themselves.
make pleats in burlap
I made this bag for about $5.50.  It was pretty easy to do.  I started by cutting the bottom front and back.  Cut two pieces 10" high x 18" wide.  I made six pleats along the top, each pleat facing the center of the rectangle.  After these were pinned in place I basted it on the sewing machine.  Do this for both the front and back of the purse.  Notice that the top is now curved.  The piece that goes on top of this will need to be fitted.

attach top band to purse
Now measure the width of top (above the pleats) along the curve line with a soft tape measure.  Mine measured 13" but this size will depend on how deep you make your pleats.  Cut two pieces of burlap 5" tall x width of your top (5"x 13" for mine).  Now...when I went to pin this piece on it appeared to be WAY too small.  Don't freak out!  Just follow the curve at the top and ease it into place.  Sew these two pieces together. Now you can start on one side of the purse and sew down one side seam, the bottom seam and then up the other side seam in one swoop!   Make your lining exactly like the outside and place it inside, wrong sides together.


Make Lining for Burlap Purse, make a burlap bag
I love this lining.  Isn't it sweet?  Before you sew the lining to the outside make your straps.  I cut two strips 22"x3".  Sew with 1/2" seam and turn inside out. Put these in between the lining and the outside and sew it all up.  On this tote I put the straps side to side rather than front to back like I did in the first Burlap Tote (Tutorial).  This is more of a "purse" while the first one I made is more like a "tote."
Shabby Burlap Rose
Now make a shabby rose!  Easy to do and lots of good tutorials out there. Two of my favorite video tutorials are here:

Freckled Laundry
and
Crystelle Boutique

I made tiny shabby roses with grosgrain ribbon for this French Feedsack Style Pillow .  They are so cute on so many different things.


Now that you can readily get colored burlap it will be fun to make unique and personal gifts.  If you use this tutorial and make one for yourself, I'd love to see what you come up with.  As usual, if you need any tips or advice or encouragement,  I'd be happy to help.  Just send me a note.

xox
Nancy

Follow up May 2, 2011

I'm still getting so many questions on how to make this purse so I thought I'd let you know that I've made some changes to and made it even better!

1) I added a magnetic snap.  Many tutorials online on how to do this.

2) I added an inside pocket.

3) I made the straps wider and interfaced them as my first purse did not hold up very well without the extra fabric inside. After experimenting I learned that I had to turn the straps right side out after sewing them and THEN cut pelon/interfacing a tad narrower than the strap.   I put a safety pin on one end of the interfacing and weave it through to the other end.  This seemed to be the only way I could get interfacing in otherwise it was a mess trying to turn them inside right if the interfacing was already sewn in.

4) round the corners a bit so they're not so dog-eared.  Follow this tutorial of mine about making better corners on pillows.  There is a good photo of how to measure from the corners to get the rounded look:

http://lamaisonreid.blogspot.com/2010/07/french-style-feedsack-fabric-pillow.html
only use these measurements:
measure 3 1/2" from the bottom corner up and 3 1/2" from bottom corner across the bottom.  Make dots here.  From the corner towards the middle mark 1" in towards the center and using those marks as a guide for curving the corners.
5) I also use iron on interfacing on the body to give it more shape.  I'm much happier with these changes!


xox
Nancy

Friday, August 13, 2010

Pavlova: Perfecting a Recipe

I woke up one Saturday morning not too long ago to find four fresh Pavlovas in the kitchen.  My scientist husband decided he was going to perfect his favorite dessert
recipe.  After all, the Pavlova is a tradition in his country of New Zealand
and he takes great pride in making a good one.

Perfect Pavlova
This one has strawberries, kiwis, and raspberries and whipped cream,  a special request of my daughter for her birthday "cake"

Here is the basic recipe and directions:
  1. Four egg whites at room temperature
  2. 1 teaspoon white vinegar
  3. 1/4 teaspoon salt
  4. 1 cup sugar
  5. 1 teaspoon vanilla
  6. 1 tablespoon cornstarch

Beat egg whites with salt and vinegar until shiny with soft peaks.  Add sugar one tablespoon at a time beating until stiff.  Add vanilla and cornstarch. Beat to mix.  Bake at 250F for 2 1/2 hours. Turn oven off and leave meringue in until cool.


Now take your meringue and spread it on a piece of parchment paper.  You can make it any shape you like.  We usually make them round to fit a dinner plate but occasionally make it larger and sometimes we make sweet little individual servings.
Traditional Pavlova
The traditional Pavlova with strawberries,kiwis, whipped cream and a sprig of mint


And yet another one: Chocolate flavored whipped cream, raspberries 
and shaved chocolate.


The Perfect Pavlova Recipe

This dessert is guaranteed to please!
Here are some additional notes from The Professor, my scientist husband:


The egg whites beat better (lower viscosity) if they are warm, and they must be free of any trace of yolk or other fatty contaminants that will reduce foaming of the egg proteins.  Adding vinegar and salt at the beginning improves and stabilizes the foam.  Once the whites are well foamed, addition of sugar slowly retains the air in the foam but adds the necessary sweetness. Once the meringue mixture is stiff, the vanilla for flavoring and cornflour (for stability) are folded then beaten in.  The meringue is placed on parchment cooking paper in an 8" circle (draw it on the back of the paper with a sharpie using a dinner plate as template), and the meringue is fashioned so that there is a wide rim surrounding a central bowl.  The cooking should be low (250 F) and long (2 hours), and the oven should remain closed until completely cool.  Abrupt reduction of temperature may result in collapse of the soft center, giving you a sticky/chewy center.  Still edible, but not as easy to cut or eat.  We like to put the whipped cream (whip 1 cup cream with 1 tsp sugar and a few drops of vanilla) and fruit on the Pavlova several hours before eating - some of the liquid from the cream moistens and softens the center of the pavlova. You can decorate the Pavlova many ways... New Zealand tradition includes pulp of the purple passion fruit.  Kiwifruit and strawberries are our mainstay (passion fruit being a rare and expensive luxury in California).  The chocolate/raspberry decoration was made with cocoa, sugar, and Kahlua in the whipped cream, and shaved chocolate and raspberries on top. 


  Enjoy!  We'd love to hear if you try this and liked it.  

xox
Nancy


Sunday, August 8, 2010

Flea Market Bain-Marie (and other great finds)

 All polished up and ready to use!

Today we ventured to our annual Antiques Faire in town and came home with some wonderful finds.  I saw this copper and porcelain Bain-Marie (double boiler) and couldn't believe my eyes when I saw a $4 price tag.  FOUR DOLLARS!  These sell new for three hundred dollars!

Before photo
 Before photo
My husband gently hammered out the small ding on the lid.  The protective coating was still on the lid and all of the copper was pretty grungy. After a little a LOT of elbow grease it "Shown like the top of the Empire State Building!"
 
I also paid $4 for the cute zinc pitcher and quickly filled it with flowers from the garden


The blue enamel coffee pot was purchased on our way home from Yosemite National Park two weeks ago.  It, too is darling filled with fresh flowers.  I've got the "flea market" bug again and hope to make it to the "Foire Nationale à la Brocante et aux Jambons" in Île de Chatou (near Paris) next month and do some SERIOUS flea market shopping!  Shhhhhhhhhhhhhh....don't tell my husband  :)

xoxo

Nancy

Related Posts with Thumbnails