
You can make your own chandelier cover in less than one hour.
Make it personal to match your decor.


Before
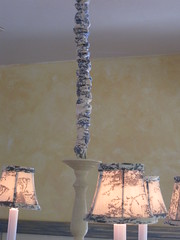
Let's face it. There is nothing attractive about chandelier chains and wires so I decided to make my own chandelier chain cover to match my breakfast nook toile bench seats and matching toile lampshades.
I had leftover toile from making my breakfast nook box cushions. I found matching toile shades for my chandelier on the internet at a price which was too good to pass up and saved me having to make them.

My chain is about 20" long. I cut a 4" strip two and one half times the length of my chain to allow for plenty of gathering. I hemmed both the top and bottom and sewed a scant 3/8" seam.


Once the "tube" was sewn I turned it with a chopstick. I just turned one end in and grabbed it inside with the chopstick and pushed until it was inside right.
You will have to remove your chandelier from the ceiling. Make sure
the power is turned off, first!

In order to get the chain and wires through I tied a piece of string to a rod and pushed that all the way through.

Tie the string to the wire and chain. (Photo only shows string tied to wire. Had to do this step twice to get it right!)

Now pull the string until all of the wires and chain come out
the other end. You're almost done! All you have to do is
attach your chandelier back to the ceiling.
You can make this chandy chain cover and install it in less
than one hour and you can personalize one for every room in your home.
Oh...it took longer to write this post than it did
to make and install this chandelier chain cover!
than one hour and you can personalize one for every room in your home.
Oh...it took longer to write this post than it did
to make and install this chandelier chain cover!


OH How I love toile! This turned out great!
ReplyDeleteGreat idea! IWe just got a new chandelier and the chain is too short and this would be perfect!
ReplyDeleteIt looks great! I don't have a chandelier yet but I'll remember this when I do get one! Thanks so much for sharing @ Anything Related!
ReplyDeleteWhat a smart idea! Thanks for linking @Creative Itch's "Sew Cute Tuesday"!
ReplyDeleteThis is definitely the easy way to do it. My chandelier was in the ceiling and i didn't want to take it down, so my method was a little different. Your chandelier looks great!
ReplyDeleteLooks wonderful....as always!! Great tutorial and the cover looks great on the chandelier!! It's amazing what a little bit of fabric can change :)) Have a wonderful day!!!
ReplyDelete~ Michella ~
~ ~ xoxo ~ ~
You never disappoint-another great fabric project :).
ReplyDeleteThis is great. I never even thought about covering the chain. DUH!
ReplyDeleteI love how it matches the shades. So cute!!
ReplyDeleteCome and enter my very first giveaway at
http://livinghappyhealthy365.blogspot.com/2010/07/giveaway-my-first-one.html
Thanks!!
Thank you so much Nancy. I guess, I need to forget the paint brush and start sewing. You make it look so easy. But first I'll do your slipcover. Great, great inspiration. I am thinking one also could make some nice paneling work with the same fabric. Here I go again thinking " walls" etc. lol
ReplyDeleteThanks and have a blessed week end
Heidi
I love This! Very custom and beautiful! Makes your chandelier so special!
ReplyDeleteI featured you on my blog. Thank you again for linking up :)
Hugs
Frenchy
I have done this with unsightly lamp cords as well, when you have a floating table or sofa. They just need to be a lot longer. I really love the toile fabric on yours!
ReplyDeleteThanks for the how-to! It looks great. Thanks for joining We're Organized Wednesday.
ReplyDeleteBeautiful blog! Thank you so much for posting about my giveaway. I wish you the best of luck!
ReplyDeleteI actually have covered a chain. What a difference.
ReplyDeleteThank you so much for deciding to follow me. It is always so nice to not only get a new follower but to find one I would like to follow as well....and besides..you have my "old" hair. :) Mine actually looked like that once...
*sigh*
:)
Mona
Looks great. I just posted about upgrading my chandelier and I'm going to try this on the chandelier that I took down that is moving to a new destination!
ReplyDeleteThanks for sharing. Your directions are great. Even I can follow them. Annette
Beautiful...love it!
ReplyDeleteAwesome idea. I never would have thought of that. New Friday follower in the house. Hope you'll come return the favor!
ReplyDeleteLots of yummy love,
Alex aka Ma, What's For Dinner
www.mawhats4dinner.com
Lovely!
ReplyDeleteGreat project!
ReplyDeleteI found you through Friday Follow, I'm a new follower and I hope you'll follow me back.
http://KellysLuckyYou.blogspot.com
Do you have the option to subscribe by email? I would love to see you show up in my inbox!
Fabulous!!! I have done this in plain fabric, but this blue and white is just fantastic. What an addition to a lovely room.
ReplyDeleteOh I love this!
ReplyDeleteAnd, love your blog....
I am signing up to follow!
Have a good day!
Leticia
great idea! Thanks for sharing.
ReplyDeletelifeofperks.blogspot.com
Ok, now this is a really neat idea! I will have to go home and see if I have a use for this on any of my lights? Is it bad that I can't remember? As always thank you for linking to It's Stinkin' Cute Craft Thursday!
ReplyDeleteThis turned out so lovely. I appreciate the tutorial and you linking up to air your laundry Friday again!
ReplyDeleteHugs,
Jami