
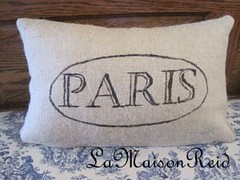
My friend Mary had a birthday last week so I
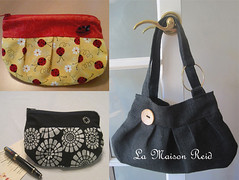
made her a French Style Feedsack Pillow
and
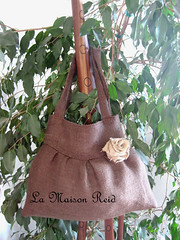
this tote
I was pretty happy with this, my first attempt at a tote bag.


I started with two 15" squares of burlap. The two pieces are
cut together, right sides together.

In order to have a flat bottom tote rather than a flat sided tote you need to cut out the corners of both the front and the back of the tote. I cut a 2" x 2" square from each corner. Now sew both side seams and the bottom seam.
Now you'll "square the corners." Open your 2" corners. In the above photo the side seam is in my left hand and the bottom of the tote seam is on the right.

Match the side seam and bottom seam and stitch this seam with 1/2" seam. This will form
the bottom of the tote. For the lining I just duplicated the tote, same size but a print fabric.

Put the lining inside the tote, wrong sides together and fold down 1/2" of the lining and 1/2" of the burlap into the inside. Cut two 4" x 22" strips of burlap for the straps and sew a
center seam. Turn them right side out.

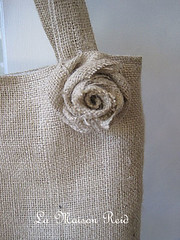
I loved the burlap rose tutorial here at Crystelle Boutique
and I attached it with a hot glue gun.


Mary loved both the tote and the pillow!


......and I love it too! I'd never have thought of burlap, but it has such a nice, sturdy look to it, and the contrast with the rose shape is very witty. (wow - I should practice and perhaps become a wine critic "This wine is light and witty with an underlay of roughness belied by the whimsical traces of honey and vanilla"
ReplyDeleteWhat do you think.....time for me to have a cup of tea and settle down!
Wow! It's very cute! I'll post it on my blog!
ReplyDeletewww.potatoboutique.blogspot.com
Thanks for sharing!
Hope your friend loves it!
I love that tote! The rosette is a super sweet touch.
ReplyDeleteit turned out perfect!!!!
ReplyDeleteVery Cute!
ReplyDeletei'm really digging burlap and love the cute linen lining and rosette.
ReplyDeleteChristy
Home-Mom.com
come hop with me tomorrow ;)
Hi Nancy - I'm so glad you had something else wonderful to link up! The rosette really gives it something extra.
ReplyDeleteThat is super cute!!!! I have some extra burlap bags.....I just may have to give this a go! Thx! :)
ReplyDeleteNice understated tote - love that flower! Great finish - thanks for sharing!
ReplyDeleteThat is really cute! I'm a new follower from It's Friday, I'm Hopping! Hope you have a great weekend!
ReplyDeleteSandy
http://suddenlysandy.com
Lovely. The rosette is gorgeous!
ReplyDeleteThanks for visiting my blog. :)
Way classy. I love the shabby chic look of burlap with a rose! I did some easy bags this summer that I posted and if you can believe it, I don't even have one myself. Everyone kept wanting them. I need to make myself one before summer is over. Don't give them all away. Lovin it.
ReplyDeleteBeautiful bag and lining the burlap is excellent. Love the rose, too!
ReplyDeleteVery pretty Nancy! The rosette adds to the chic-ness of the bag. LOVE it!
ReplyDeleteDebbie@houseatthelake
Mary is a lucky girl! Who WOULDN'T love those??
ReplyDeleteThe flower makes it so special! Thanks for the tutorial!
ReplyDeleteHugs
Charo
very cute. The flower does add the charm.
ReplyDeleteI had no idea burlap could be so pretty. :) I love the added flower, really makes the bag.
ReplyDeleteBeautiful...
ReplyDeleteSylvia
What a lucky gal your friend is Nancy...Love the burlap tote, it turned out beautiful. And the rose is such a sweet touch. You can't tell but I'm turning a little green ;-) Have a wonderful weekend.
ReplyDeleteHugs and Kisses,
♥Ana
this is so beautiful...i love how simple but elegant it is
ReplyDeleteAhhhh...love this burlap bag...that flower adds so much charm!
ReplyDeleteBlessings,
Linda
Great tote, great tutorial, thanks!!
ReplyDeleteVery cute idea!! Stopping over from WW. Love your blog.
ReplyDeleteheather
That turned out so cute! I love it.
ReplyDeleteI've always loved the feel and look of burlap.. your bag is just wonderful!
ReplyDeleteI wanted to thank you for your visit to my blog yesterday.. and your kind words... thanks so much!
Sandy
thewondersofdoing@blogspot.com
Great idea and great tutorial! I bet your friend loves it. Thanks for sharing. Happy Sewing! :o)
ReplyDeletewww.seamsinspired.com
I can't believe this was your first attempt. It turned out beautifully! I love the added detail of the rosette. Thanks for sharing the great tutorial.
ReplyDeleteGreat job! Your friend is blessed. The little flower makes it perfect. Lisa~
ReplyDeleteCute! The little flower is a great little addition.
ReplyDeleteLove it, love it. I am going to make me one, but I will put pockets on the outside for my paint brushes. They deserve a cool bag like the one you designed. If I get it done properly I will send you a pic of my (your) work.
ReplyDeleteThanks
xox
Heidi
I LOVE the tote bag! ~ I'll have to make myself one! Also I love how mums painting features in a few of your posts. Doesn't it just set the scene. xx
ReplyDeleteWhat a beautiful tote bag. The rose certainly adds charm to it.
ReplyDeleteYour burlap bag is WONDERFUL!!! I may have to try my hand at one after reading your tutorial! the rose is a perfect "final touch." Thanks for being a new follower of mine, too! Have a great Monday! :)
ReplyDeleteNancy, I LOVE your tote! It's perfect! You did such a great job - and what a wonderful tutorial, too! :)
ReplyDeleteI'm your newest follower, Thank you for share nice blog,
ReplyDeletehttp://beonefineday.blogspot.com/
Have a nice day.
Nan
I love the bag. It is the perfect thing to make for my sister's birthday, which has already passed. We are getting together this week. I don't know wher my burlap is right now, in a tub somewhere? I'll have to pick up more this afternoon. Thanks so much for sharing.
ReplyDeleteSuch a neat bag! Thank you for sharing the tutorial!
ReplyDeleteFantastic! Thanks for sharing!
ReplyDeleteI LOVE this! You did a wonderful job. And thanks for the tutorial! :]
ReplyDeleteI love it! You made it sound and look so easy. I've bookmarked it in my crafts folder for future use.
ReplyDeleteI’m having a new link party “Cheap Thrills Thursday” starting the 29th. It’s for creative ideas that cost under $20. If you have a project you’d like to share, I’d love for you to stop by and join in!
Kat
www.BlackKatsDesign.blogspot.com
Hello! Just wanted to let you know I featured your tote today! Thanks so much for joining the Sunday Showcase Party! I greatly appreciate it. Hope you have a wonderful week! Stephanie Lynn
ReplyDeleteThis comment has been removed by a blog administrator.
ReplyDeleteI love this idea! Its so classy with the little rosette. Thanks for sharing it!
ReplyDeleteYou have great taste, so classy. Love the bag, love the rose, love the burlap!
ReplyDeleteOh, that is SO cute! I love it! You did a wonderful job on it. :)
ReplyDeleteYour bag is very pretty. I love the rose.
ReplyDeleteI love anything burlap.....thanks for linking @Creative Itch's "Sew Cute Tuesday"!
ReplyDeleteI make totes all of the time for little people. I never thought of making a "grown-up" one. This is fantastic. I love the flower too.
ReplyDeleteThanks for linking to Transform Tuesday!!
I think this is just perfect, oh, so cute! I love how it turned out!
ReplyDeleteLooks lovely! Well done :)
ReplyDelete- Jana Kim
Thanks so much for the tutorial. I have been meaning to make myself a purse, but I have no talent when it comes to sewing. A pattern will be helpful!! :)
ReplyDeleteI love the bag and the rose sets it off to perfection, but don't you use a machine? You seem to sew quite a lot, my hands feel tired even thinking of doing it all by hand.
ReplyDeleteI'm in San Rafael, just SW of the delta - well spotted!
Great looking bag and the rose adds just the right finish. So glad that burlap is being used more - I recall making flowers and using them on long skewers over thirty years ago. Wow - some things just never go out of style. Great blog.
ReplyDeleteAdorable!!! I love the little flower!
ReplyDeleteIf it's alright with you, I would like to link to this post. I made my own purse and I'd like to credit you. :-) Thanks for inspiring!!!!
ReplyDeletevery cute!
ReplyDeletethanks for linking up.
So, so cute!!! I love making bags/totes too. The last one I made, I totally forgot to take pictures while in progess :-(
ReplyDeleteGreat tutorial!!!
lifeofperks.blogspot.com
Beautiful! I love it! We appreciate you joining us this week for Anything Related!
ReplyDelete{Rebekah}
This is so pretty...and I love your "tote-torial"!!!
ReplyDeleteThat looks super easy and super cute! I love it and thank you for linking to It's Stinkin' Cute Craft Thursday!
ReplyDeleteYou've been featured on Its So Very Cheri. check it out and grab your FEATURED button.
ReplyDeleteIf you have any posts that use one of our sponsor products at www.diyclubinc.com, you should enter, the prize package is AWESOME.
Cheri
Fabulous bag indeed. You gave so many inspiration out here in blog land. I appreciate you linking to my party and would love if you added my link or button.
ReplyDeleteThank you for your sharing. It's a sweet and lovely bag.
ReplyDeleteCheck out this post where I talk about Nancy and her purse!
ReplyDeletehttp://potatoboutique.blogspot.com/2010/07/blog-post_22.html
Love the French bread by the way!!!
Great tasty touch!
love it!!!
ReplyDeletethanks for the tutorial (hope this is not the second time i wrote.) =)
thanks for signing up to follow my blog.
I'm putting a link to this on my blog. Hope you do not mind.
hugs and blessings
barbara jean
Lovely tote bag! Good job! Burlap is course and sheds. Did you wash the fabric first to avoid the shedding and soften the fabric? Or, what did you do?
ReplyDeleteThere's something about hessian (burlap), that makes it timeless. It's a look that co-ordinates well with a range of clothes... dress it up with a smart dress or wear it with jeans. The rose finishes it off perfectly. I must buy myself a hot glue gun...
ReplyDeleteLove it, Love it, Love it! Gotta go order me some burlap now.
ReplyDeletethank you. going to make this with my sis.
ReplyDeleteThis comment has been removed by the author.
ReplyDeletePiękna torba!!!Super blog!!!Będę często odwiedzać :)Pozdrawiam z Polski:)))
ReplyDeleteI love this!! Megan
ReplyDeleteSo gorgeous!!! Love the color and the fabric flower! Thanks so much for sharing the great tutorial! I'd love for you to visit my blog.
ReplyDeleteHappy weekend!
Hugs from Portugal,
Ana Love Craft
www.lovecraft2012.blogspot.com
Awesome tutorial. That's pretty
ReplyDeletebellísimo !!!!!!!!!!!!!!!!
ReplyDeleteWhen you sewed the burlap, did you have to use a special needle for your sewing machine?
ReplyDelete